Understanding Diecast Decals and Their Removal
Diecast models are prized possessions for collectors and enthusiasts, often featuring intricate details, including decals. These decals, though adding authenticity, can sometimes become damaged, faded, or simply unwanted. Removing them safely and effectively is a crucial skill for anyone involved in diecast model restoration or customization. This guide offers a comprehensive overview of the process, ensuring you can refresh your models without causing damage. Understanding the materials and techniques involved is the first step towards successful decal removal, preserving the value and appearance of your diecast collection. This process allows for personalization, correction of errors, or simply a refreshed look for your cherished models, and is a core skill for model collectors and restorers.
What Are Diecast Model Decals
Diecast model decals are essentially thin, adhesive-backed images or graphics applied to the model’s surface. They can represent various elements, from manufacturer logos and racing stripes to intricate details such as license plates and instrument gauges. The decals are typically made from thin plastic or vinyl and are applied using an adhesive that bonds to the model’s paint or surface. Decals come in various forms, including water-slide decals, which require soaking in water to release them from their backing, and self-adhesive decals that are applied directly. They are used to add authenticity, detail, and visual appeal to diecast models, however they are prone to wear and tear, making removal a necessary task.
Why Removing Decals Is Necessary

There are several reasons why removing decals from diecast models may be necessary. Over time, decals can deteriorate due to exposure to light, heat, and handling, leading to cracking, fading, or peeling. Damage to the model’s surface can also occur, making decal removal essential for maintaining the model’s appearance and value. Sometimes, the original decals may be incorrect or damaged, and removing them becomes necessary for proper restoration or customization. Collectors may also choose to remove decals to apply new, more detailed, or accurate decals, or to change the model’s appearance entirely. Additionally, removing the old decals may be a step towards repainting the model or further customization, such as adding weathering effects or modifying the model in other ways.
Tools and Materials for Removing Diecast Decals
The right tools and materials are essential for safely and effectively removing decals from diecast models. Gathering the necessary items beforehand will ensure a smoother and more successful process. This includes a careful selection of tools to minimize any risk to the model’s paintwork, ensuring you have all the required equipment for the task. Preparing your workspace with these items helps avoid any potential damage to the model and make the entire process much easier. Having everything ready before starting allows you to proceed methodically, avoiding the need to stop and search for missing items, so that you can focus on the delicate work of decal removal.
Essential Supplies for Decal Removal
Essential supplies include soft cloths or cotton swabs for applying solvents and cleaning the model’s surface. Isopropyl alcohol or a specialized decal remover solvent is needed to soften and dissolve the decal adhesive. You’ll also want a clean, soft cloth to wipe away residue and debris, and some warm water and mild soap for cleaning the model. Ensure you have good lighting to clearly see the decals and any remaining adhesive. Safety precautions such as working in a well-ventilated area, and wearing gloves to protect your hands is also a must.
Recommended Tools for the Task

A selection of tools is recommended to safely remove the decals. A hobby knife or a specialized decal removal tool is helpful for gently lifting the edges of the decals. Tweezers can assist in carefully grabbing and removing small pieces of decal. A hair dryer on a low setting can be used to apply gentle heat to soften the adhesive. A magnifying glass can help to inspect the model and ensure that all residue is removed. Additionally, consider a plastic scraper or a similar tool with a blunt edge to carefully lift the decal without scratching the paint. These tools allow for a more precise and controlled decal removal process.
Step-by-Step Guide to Removing Diecast Decals
Following a step-by-step approach ensures that the decal removal process is carried out safely and effectively. Taking the time to follow the instructions correctly, avoids damaging the model and achieving the best results. This detailed guide will provide all the information needed to remove decals without causing damage, and the resulting model will be restored to its original glory. By carefully following each step, you can significantly enhance the appearance of your diecast models and protect their value. Each step is designed to be as simple and straightforward as possible.
Softening the Decals
The first step is to soften the decals to loosen the adhesive. This can be done through several methods. Start by applying gentle heat using a hair dryer on a low setting. The heat helps to soften the adhesive, making it easier to lift the edges of the decal. Another method is to apply a small amount of decal removal solvent to the edges of the decal, allowing it to soak in for a few minutes. This will loosen the adhesive, and make the decal removal much easier. Always test the chosen method on a small, inconspicuous area of the model first to check the effect on the paint.
The Gentle Heat Method

Using a hair dryer on a low setting is an effective and safe method for softening decals. Hold the hair dryer a few inches away from the model’s surface and move it back and forth, applying heat evenly. The heat will soften the adhesive, allowing you to gently lift the edges of the decal. Avoid overheating the model, as this can damage the paint. Once the edges start to lift, carefully use a hobby knife or a specialized decal removal tool to gently peel away the decal. This method is best for decals that are in good condition and not severely damaged. This also will avoid any damage to the paint finish.
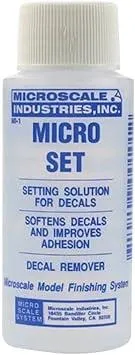
Using Specialized Solvents
For stubborn decals, using a specialized decal removal solvent is an effective option. Apply a small amount of the solvent to the edges of the decal using a cotton swab. Allow the solvent to soak into the adhesive for a few minutes, softening the bond between the decal and the model. Carefully use a hobby knife or a plastic scraper to lift the edges and peel off the decal. Make sure to test the solvent on a hidden area first to ensure it doesn’t damage the paint. Wipe away any excess solvent and decal residue immediately after removal. Using solvents is a very effective option for older and more damaged decals.
Scraping Decals Off
When the decals are softened, the next step is to carefully scrape them off the surface. Use a hobby knife or a plastic scraper with a blunt edge to gently lift the edges of the decal. Avoid applying too much force, as this can damage the paint. If the decal is particularly stubborn, apply more heat or solvent and allow it to soak for a longer period. Work slowly and methodically, removing small sections of the decal at a time. Use tweezers to remove the small pieces of the decal. It is important to exercise patience and care during this step to prevent any damage.
Cleaning and Preparing the Model

After removing the decals, the model’s surface needs to be thoroughly cleaned to remove any remaining adhesive residue. Cleaning the model helps to ensure that any new decals will adhere properly and that the surface is ready for any further customization or restoration work. The quality of this step directly affects the final result and helps to preserve the model’s finish. This step will prepare the model for its next step, whether that’s repainting or further detailing.
Removing Adhesive Residue
Use a soft cloth or cotton swab to apply isopropyl alcohol or a specialized adhesive remover to the area where the decals were. Gently rub the area to dissolve the adhesive. Be careful not to apply too much pressure, as this could damage the paint. If the adhesive is stubborn, you can let the solvent sit for a few minutes before wiping it off. Repeat the process until all the adhesive is removed. Inspect the surface carefully to ensure that no residue remains. This step is essential to guarantee a smooth surface for any future decals or repainting, and ensuring that there are no sticky areas on the model.
Polishing and Protecting the Finish
Once the adhesive residue is removed, it’s important to polish the surface to restore its shine. Use a polishing compound suitable for the model’s paint type and gently rub it onto the surface with a soft cloth. This will remove any minor imperfections and restore the original shine. After polishing, you can apply a protective wax or sealant to protect the paint finish from scratches and other damage. This will help to preserve the model’s appearance and value. The result will be a beautifully restored surface ready for future decals or display. Applying a wax or sealant will further protect the surface.
Common Mistakes to Avoid
Avoiding common mistakes is critical to the success of your decal removal efforts. These mistakes can lead to damage, frustration, and a less-than-perfect outcome. Being aware of them allows you to take extra precautions and adjust your approach for better results. Always take extra care and attention when working with diecast models. The effort you put into your work will be reflected in the final outcome. This is particularly important, as the materials are often very delicate, and mistakes can be difficult to correct.
Using Excessive Force or Heat
One of the most common mistakes is using excessive force or heat. Applying too much force can scratch or damage the paint finish. Similarly, using too much heat can cause the paint to bubble or blister. Always use gentle techniques and apply heat in short bursts, monitoring the model’s surface closely. If the decal doesn’t come off easily, reassess your method and consider using a different approach. Patience is key, and forcing the process will almost certainly lead to damage. Always take your time and avoid pushing the process.
Ignoring the Model’s Material
Another common mistake is ignoring the model’s material. Different diecast models may have different paint types and finishes. Some models may be more sensitive to heat or solvents than others. Before starting, research the model’s materials and the best practices for that specific type of paint. Always test any solvents or heat treatments on a small, inconspicuous area first. Understanding the model’s composition allows you to choose the right tools and techniques, ensuring that you don’t damage the model. Ignoring the model’s material can result in irreversible damage, so research and testing are important.
Alternative Decal Removal Methods

Sometimes, standard methods are not suitable for certain decals or model types. Knowing alternative approaches can be useful when faced with challenging situations. Experimenting with different techniques allows for greater flexibility and increases the chances of success. Always assess the situation carefully and choose the method most likely to succeed, as sometimes a different technique is required. This is an advantage that experienced restorers and collectors bring to the table, and knowing these options helps you find the best approach.
Using a Hair Dryer
The hair dryer method offers a controlled way to soften decals. Set the hair dryer to a low heat setting and hold it a few inches away from the model’s surface. Move the hair dryer back and forth, evenly heating the decal. The heat will soften the adhesive, and help you carefully lift the edges of the decal. This method is effective for most decals and is easy to control. This method is particularly useful for delicate decals or models with fragile finishes. Always test the heat on a small area first to ensure that it is safe to use on your model.
Applying a Decal Remover Solution
Decal removal solutions are specifically designed to dissolve the adhesive that holds the decals. Apply the solution to the edges of the decal, allowing it to soak in for a few minutes. This will soften the adhesive and make it easier to remove the decal. After softening, gently lift the edges with a hobby knife or a plastic scraper. This method is great for stubborn decals and is very effective. Always test the remover on a hidden area of the model first. Be sure to follow the manufacturer’s instructions carefully, as some solvents can be strong and require extra care and safety precautions. Always use in a well-ventilated area.
Final Thoughts on Diecast Decal Removal
Removing decals from diecast models is a rewarding process. It allows you to restore, customize, and enhance the appearance of your prized possessions. Following the steps and using the right tools will help you achieve great results, without damaging your models. The skills and techniques discussed will empower you to tackle any decal removal project with confidence. With practice and patience, you’ll be able to remove decals effectively, protect your models, and add value to your collection. Remember that attention to detail, care, and patience are key to success in this hobby. The ability to remove decals opens up many possibilities for customization and restoration.